Last Updated on February 23, 2022
Facebook Gaming is a dedicated game streaming hub created by Facebook in order to compete with the current streaming giants: Twitch and YouTube.
Intro to Facebook gaming
Originally launched in June 2018, Facebook Gaming’s growth was quite slow at the beginning but started to really kick in with its 2020’s merge with Mixer.
Nowadays, Facebook Gaming’s community is bigger than ever before, with popular streamer names such as Jeremy “Disguised Toast” Wang, Kevin “Lord Kebun” and Mitch “Vader” amongst the wide roster available on the platform.
Why should you join Facebook Gaming?
For you as a new streamer, the main benefits of joining Facebook Gaming instead of the other, more traditional platforms, are:
- Less competition – with less streamers comes less competition, which can be a really big deal. For small streamers, any additional eyeball can make an impact and help you grow your audience.
- The integration with Facebook – One of the perks of Facebook Gaming being a subsidiary of Facebook is the solid integration interfaces between the two platforms. Sharing your content with your friends is extremely easy, and they can push it forward even further via their own feeds.
By all signs, 2021 seems to be a great year for Facebook Gaming, and it’s your turn to seize the opportunity and jump on the live-streaming bandwagon. In this article, we’ll show you exactly how to live-stream on Facebook Gaming in less than 10 minutes.
Create a Facebook page for live streaming
The first thing you need in order to start live streaming on Facebook is obviously to have a Facebook account.
Next, you must set up a gaming page in order to join Facebook Gaming. You can do it using this link, and filling in the required info to create your gaming page.
Setting up a streaming software
In order to broadcast on Facebook Gaming from a desktop computer, you need to use a streaming software. The main benefits of those types of software are the ease of use and affordability they provide for new streamers.
Each streaming software has its own set of pros and cons. The most popular options in the market currently are:
- OBS Studio — A free, open-source streaming software with built-in Facebook compatibility features. Tends to be the go-to solution for new streamers.
- Streamlabs OBS — Streamlabs is one of the biggest online streaming software companies, and their own version of OBS would give you access to a few additional features
- XSplit — Another software solution for broadcasters who are willing to pay for additional features and better support.
Setting up OBS Studio
All of the software mentioned above would work very well with Facebook. For the purpose of this tutorial, we would use OBS Studio:
Step 1
Download OBS Studio
Step 2
Install it by the following automatic instructions.
Step 3
Open OBS, click on “Tools” and then “Auto-Configuration Wizard”.
Step 4
In the Auto-Configuration Wizard, follow the optimal instructions until the “Stream Information page”:
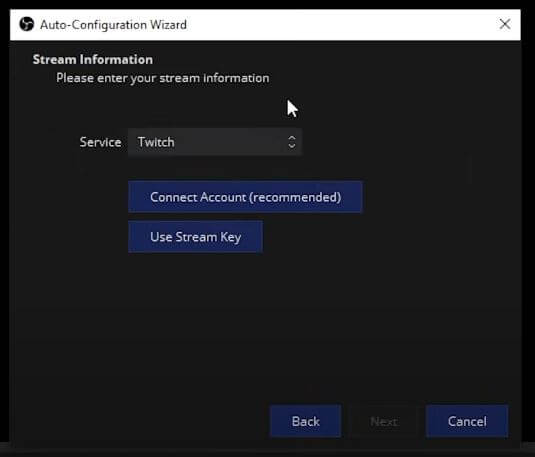
Step 5
On this page, choose Facebook Gaming on the “Service” dropdown menu and then click on “Connect Account”.
Step 6
Enter your Facebook account and authorize OBS Studio to connect to your account.
Step 7
Continue with the “Auto-Configuration Wizard” and allow OBS to test your setup.
Step 8
Click on “Apply Settings”.
After following those instructions, you should now be able to see your chat tab, as well as your initial streaming setup.
Go live and start streaming
Starting a stream on Facebook Gaming is extremely easy. Just follow the steps below:
Step 1
Login to Facebook.
Step 2
Click “Create live video” and choose your gaming page as the place where you will host your live stream.
Step 3
Next, copy and paste the Facebook stream key and stream URL to the settings of your streaming software (OBS in our example).
Step 4
Click on the “Start streaming” button in the streaming software. You will be able to see the preview of your stream.
Step 5
Head over to your Facebook Gaming creator page and make sure to tag the game you are playing and to add a description of your stream.
Step 6
Finally, click on the “Go Live” button in your Facebook Gaming creator page, and you are done!